
[Java/Spring] 김영한 스프링 입문 정리 #4 스프링 빈과 의존관계
1. 컴포넌트 스캔과 자동 의존관계 설정
회원 컨트롤러가 회원서비스와 회원 리포지토리를 사용할 수 있게 의존관계를 준비하자.
MemberController 생성하기
- 생성자에 @Autowired가 있으면 스프링이 연관된 객체를 스프링 컨테이너에서 찾아서 넣어준다. 이렇게 객체 의존관계를 외부에서 넣어주는 것을 DI (Dependency Injection), 의존성 주입이라 한다.
- 이전 테스트에서는 개발자가 직접 주입했고, 여기서는 @Autowired에 의해 스프링이 주입해준다.
package hello.hello_project.controller;

import hello.hello_project.service.MemberService;
import org.springframework.beans.factory.annotation.Autowired;
import org.springframework.stereotype.Controller;

@Controller
public class MemberController {

    private final MemberService memberService;

    @Autowired
    public MemberController(MemberService memberService){
        this.memberService = memberService;
    }
}
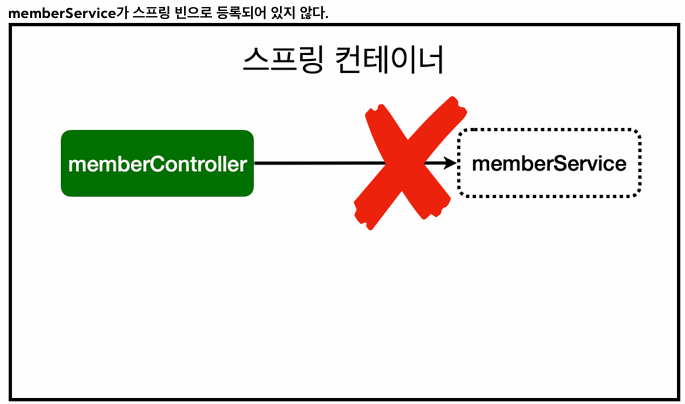
memberService가 스프링 빈으로 등록되어 있지 않기 때문에 아래와 같은 오류가 발생하게 된다.
Consider defining a bean of type ‘hello.hellospring.service.MemberService’ in your configuration.
- 참고: helloController는 스프링이 제공하는 컨트롤러여서 스프링 빈으로 자동 등록된다. (@Controller 가 있으면 자동 등록)
스프링 빈을 등록하는 2가지 방법
- 컴포넌트 스캔(@Service, @Repository, @Autowired)과 자동 의존관계 설정
- 자바 코드로 직접 스프링 빈 등록하기
컴포넌트 스캔 원리
- @Component 애노테이션이 있으면 스프링 빈으로 자동 등록된다.
- @Controller 컨트롤러가 스프링 빈으로 자동 등록된 이유도 컴포넌트 스캔 때문이다.
- @Component를 포함하는 다음 애노테이션도 스프링 빈으로 자동 등록된다.
- @Controller
- @Service
- @Repository
회원 서비스 스프링 빈 등록
@Service
public class MemberService {

    private final MemberRepository memberRepository;

    @Autowired
    public MemberService(MemberRepository memberRepository){
        this.memberRepository = memberRepository;
    }
...
}
- 참고: 생성자에 @Autowired를 사용하면 객체 생성 시점에 스프링 컨테이너에서 해당 스프링 빈을 찾아서 주입한다. 생성자가 1개만 있으면 @Autowired는 생략할 수 있다.
회원 리포지토리 스프링 빈 등록
@Repository
public class MemoryMemberRepository implements MemberRepository{
...
}
스프링 빈 등록 이미지
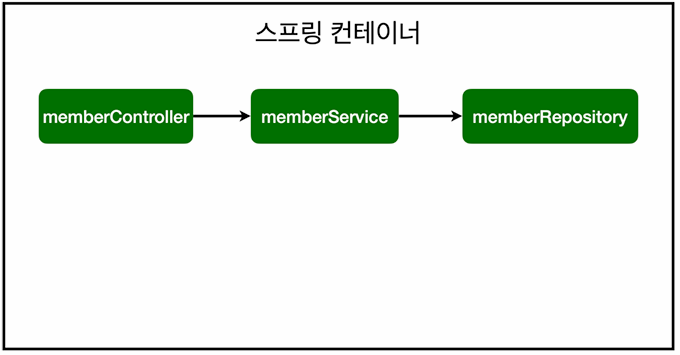
- memberService와 memberRepository가 스프링 컨테이너에 스프링 빈으로 등록되었다.
- 참고
- 스프링은 스프링 컨테이너에 스프링 빈을 등록할 때, 기본으로 싱글톤으로 등록한다(유일하게 하나만 등록해서 공유한다.)
- 따라서 같은 스프링 빈이면 모두 같은 인스턴스다. 설정으로 싱글톤이 아니게 설정할 수 있지만, 특별한 경우를 제외하면 대부분 싱글톤을 사용한다.
2. 자바 코드로 직접 스프링 빈 등록하기
회원 서비스와 회원 리포지토리의 @Service, @Repository, @Autowired 애노테이션을 제거하고 진행하자
SpringConfig 클래스 생성
package hello.hello_project;

import hello.hello_project.repository.MemberRepository;
import hello.hello_project.repository.MemoryMemberRepository;
import hello.hello_project.service.MemberService;
import org.springframework.context.annotation.Bean;
import org.springframework.context.annotation.Configuration;

@Configuration
public class SpringConfig {

    @Bean
    public MemberService memberService(){
        return new MemberService(memberRepository());
    }

    @Bean
    public MemberRepository memberRepository(){
        return new MemoryMemberRepository();
    }
}
- 여기서는 향후 메모리 리포지토리를 다른 리포지토리로 변경할 예정이므로, 컴포넌트 스캔 방식 대신에 자바 코드로 스프링 빈을 설정한다.
- 참고
- XML로 설정하는 방식도 있지만 최근에는 잘 사용하지 않으므로 생략한다.
- DI에는 필드 주입, setter 주입, 생성자 주입 이렇게 3가지 방법이 있다. 의존관계가 실행중에 동적으로 변하는 경우는 거의 없으므로 생성자 주입을 권장한다.
- 실무에서는 주로 정형화된 컨트롤러, 서비스, 리포지토리 같은 코드는 컴포넌트 스캔을 사용한다. 그리고 정형화 되지 않거나, 상황에 따라 구현 클래스를 변경해야 하면 설정을 통해 스프링 빈으로 등록한다.
- 주의
- @Autowired를 통한 DI는 helloController, memberService 등과 같이 스프링이 관리하는 객체에서만 동작한다. 스프링 빈으로 등록하지 않고 내가 직접 생성한 객체에서는 동작하지 않는다.
댓글남기기