
[jQuery] jQuery + fetch(2)
서울의 실시간 대기 정보를 가져와 웹 페이지에 표시를 해보자
지금까지 버튼을 클릭했을 때 데이터를 변경하도록 했지만, 이제는 자동으로 페이지 로딩이 완료되면 자동으로 fetch에 call을 해서 정보를 붙여주는 작업을 할 것이다.
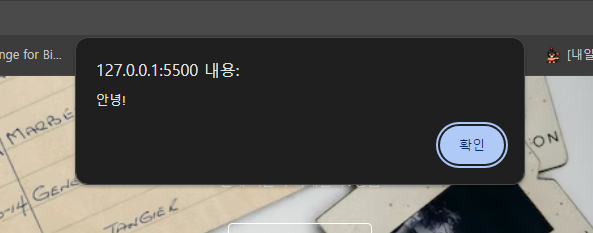
- 연습을 위해 아래 코드를 붙여넣어보자!
$(document).ready(function () {
  alert("안녕!");
});
- 짜잔!🎇
document가 ready되면 alert이 띄어진 것을 볼 수 있다.
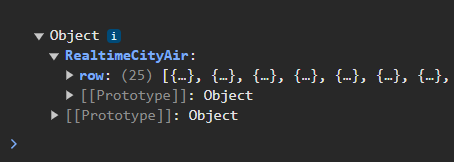
그럼 alret이 아닌, fetch를 통해 데이터를 넣으면 어떻게 될까?
$(document).ready(function () {
  let url = "http://spartacodingclub.shop/sparta_api/seoulair";
  fetch(url)
    .then((res) => res.json())
    .then((data) => {
      console.log(data);
    });
});
- 짜잔!🎇
페이지가 로딩되면 자동으로 fetch가 되는 것을 볼 수 있다.
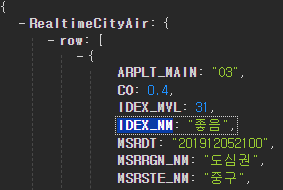
- 이제 미세먼지 상태를 웹페이지에 띄어주기 위해, RealtimeCityAir의 row의 0번째 값의 IDEX_NM를 가져와보자
IDEX_NM는 다음과 같다.
$(document).ready(function () {
let url = "http://spartacodingclub.shop/sparta_api/seoulair";
fetch(url)
.then((res) => res.json())
.then((data) => {
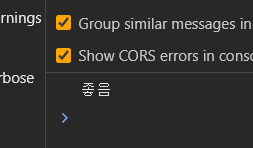
let mise = data["RealtimeCityAir"]["row"][0]["IDEX_NM"];
console.log(mise); // test
});
});
- 짜잔!🎇
- 마지막으로, 이 데이터가 들어갈 공간에 span 태그로 묶어 id값을 주고
<p>
  현재 서울의 미세먼지 : <span id="msg">좋음</span>
</p>
- .text를 사용하여 mise로 #msg의 텍스트를 변경하자!
$(document).ready(function () {
  let url = "http://spartacodingclub.shop/sparta_api/seoulair";
  fetch(url)
    .then((res) => res.json())
    .then((data) => {
      let mise = data["RealtimeCityAir"]["row"][0]["IDEX_NM"];
      $("#msg").text(mise);
    });
});
- 짜잔!🎇
 아래에서 “좋음” 을 지워도 그대로 “좋음” 으로 출력되는 것을 볼 수있다.
<p>현재 서울의 미세먼지 : <span id="msg">좋음</span></p>
댓글남기기