
[Next.js] Rendering
1. v12와 v13의 주요 차이점
Next.js에서 가장 중요한 개념이 바로 렌더링 방식이다.⭐(CSR, SSR, ISR, SSG)
- Next.js 버전 12까지는 렌더링 방식을 “페이지 단위”로 규정하였다.
- about 페이지는 SSG로 동작
- todolist 페이지는 SSR로 동작
- sample 페이지는 CSR로 동작
하지만 Next.js 13 버전에서는 React 18 버전에서 제시한
- 서버컴포넌트(서버상에서만 동작 → node.js 환경)
- 클라이언트컴포넌트(브라우저에서만 동작 → 브라우저 환경)
을 토대로 렌더링 방식이 기존 “페이지 단위”가 아닌 “컴포넌트 단위”로 변경되었다. 컴포넌트 하나 하나가 각각의 렌더링 방식을 가질 수 있게 되었다!!
정리
- Next.js 버전 12는
페이지 단위가 렌더링 기준 - Next.js 버전 13은
컴포넌트 단위가 렌더링 기준⭐
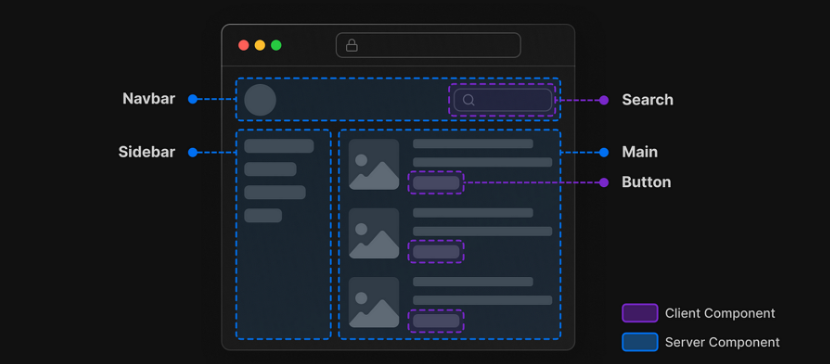
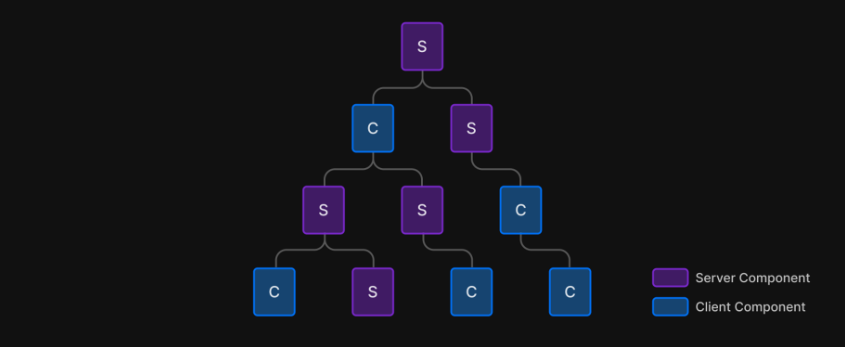
위 그림과 같이 서버컴포넌트와 클라이언트컴포넌트가 공존이 가능하다.
2. 클라이언트 컴포넌트 vs 서버 컴포넌트
2.1 node.js 환경과 브라우저 환경
기본적으로 app 폴더 하위의 모든 컴포넌트는 서버컴포넌트이다.⭐⭐
"use client" 표시가 없으면 무조건 서버컴포넌트!
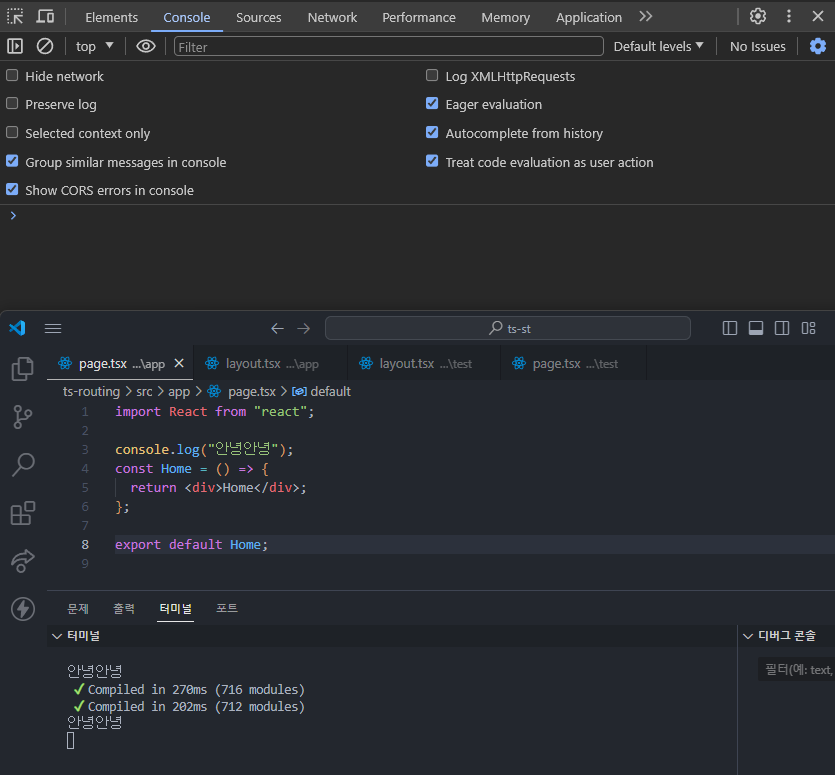
- 크롬 브라우저가 아니라 서버를 돌리고 있는 localhost인 내 컴퓨터의 node 환경에서 console.log가 출력되고 있다.
- 만약 aws 같은 클라우드 컴퓨팅에서 돌아가고 있다면, 사용자의 브라우저가 아니라 해당 서버의 로그에 console.log가 출력될 것이다.
- 이처럼 컴포넌트의 실행 환경이 브라우저인지, 서버인지에 따라 서버컴포넌트인지 클라이언트 컴포넌트인지가 결정된다.
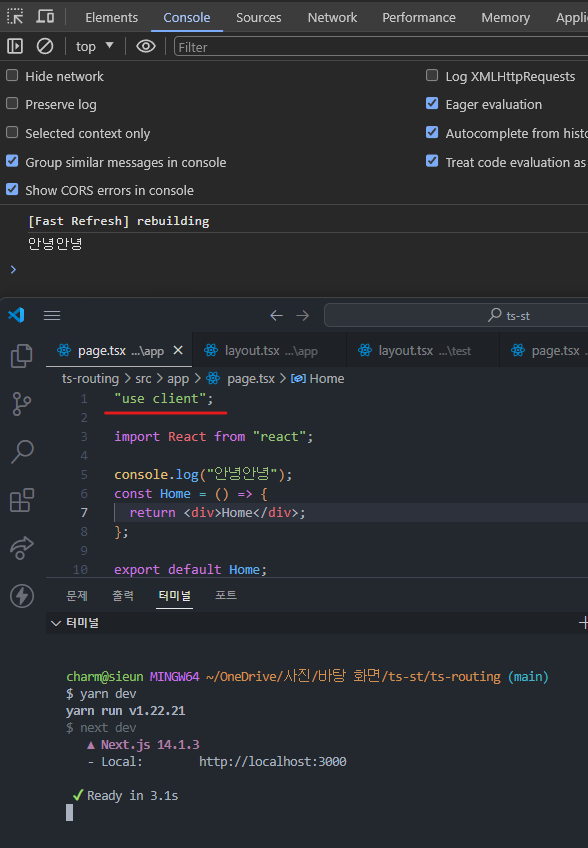
- 위와 같이
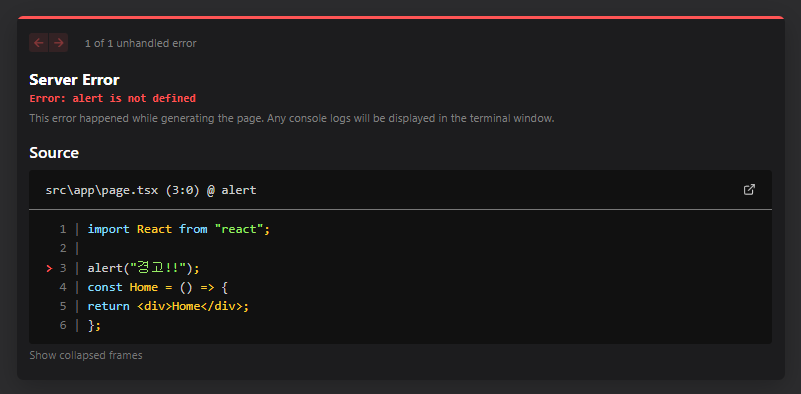
"use client"를 적어주면 브라우저에 console.log가 출력되고 있는 것을 확인할 수 있다. - 서버 컴포넌트에서는 alert, confirm 처럼 유저와의 상호작용이 필요한 메서드, 기능은 사용할 수 없지만,
“use client”;를 컴포넌트 최상단에 붙히면 사용할 수 있게 된다.
컴포넌트에 alert(“hello”)를 출력해보자
import React from "react";

alert("경고!!");
const Home = () => {
  return <div>Home</div>;
};

export default Home;
alert는 서버 컴포넌트에서(Node.js 런타임 환경)는 사용할 수 없는 것을 확인할 수 있다.
2.2 SC CC의 사용
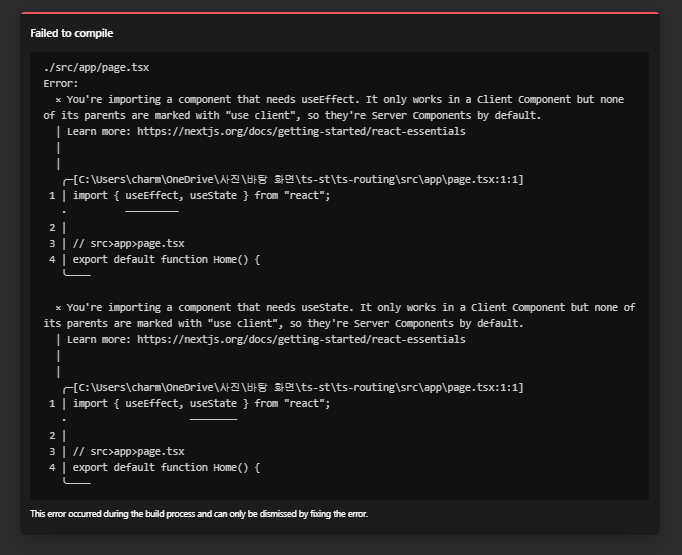
아래 예시를
"use client";를 넣은 상태에서 1회 테스트 + 뺀 상태에서 1회 테스트를 해보자
"use client";

import { useEffect, useState } from "react";

// src>app>page.tsx
export default function Home() {
  const [count, setCount] = useState(0);

  useEffect(() => {
    console.log("렌더링이 완료되었습니다.");
  }, []);

  const handleClick = () => {
    setCount(count + 1);
  };

  return (
    <div className="p-8">
      행복한 하루 보내세요!
      <div>{count}</div>
      <button onClick={handleClick}>클릭</button>
    </div>
  );
}
- “use client”가 없다면, 오류가 발생하는 것을 확인할 수 있다.
- 앞으로 아래와 같은 오류가 발생한다면 클라이언트 컴포넌트로 변경해야한다.
언제 클라이언트 컴포넌트(SC), 서버 컴포넌트(CC)를 사용할까?
Next.js 공식문서에선 User와의 상호작용이 있는 경우 CC를, 그 외의 경우는 SC를 쓰도록 권장하고 있다.

2.3 컴포넌트 분리하기
2.3.1 예시1
만약 이런 코드가 있다고 가정해보자
// src > app > page.tsx
export default function Home() {
  return (
    <div className="p-8">
      안녕하세요! 내배캠 리액트.. 아니아니 넥스트입니다!
      <section>
        <h1>제목</h1>
        <p>내용</p>
        <ul>
          <li>항목1</li>
          <li>항목2</li>
          <li>항목3</li>
        </ul>
      </section>
      <button
        onClick={() => {
          alert("안녕하세요!");
        }}
      >
        클릭
      </button>
    </div>
  );
}
- 위 코드는 “use client”가 없기 때문에 서버에서만 동작한다.(서버 컴포넌트)
- useEffect, useState, onClick 등은 클라이언트 컴포넌트에서만 사용 가능한 기술이기 때문에 오류가 발생한다.
그렇다면
"use client";을 사용하면 되는 것 아닌가??!
아니다!!!! onClick 하나 때문에 모든 컴포넌트의 모든 구성요소가 클라이언트 컴포넌트로 만들어버리는 것은 엄청난 낭비이다. (Next.js를 사용하는 이유 없어짐)
“default는 서버 컴포넌트이다. 꼭 필요한 곳에만 “use client”를 이용해서 클라이언트 컴포넌트로 만들어야 한다.” 는 것을 명심하자!⭐⭐⭐
yarn build
yarn start
아래와 같이 컴포넌트 분리를 할 수 있다.
- 서버 컴포넌트
// src > app > page.tsx
import Button from "@/components/Button";

export default function Home() {
  return (
    <div className="p-8">
      안녕하세요! 내배캠 리액트.. 아니아니 넥스 트입니다!
      <section>
        <h1>제목</h1>
        <p>내용</p>
        <ul>
          <li>항목1</li>
          <li>항목2</li>
          <li>항목3</li>
        </ul>
      </section>
      <Button />
    </div>
  );
}
- 클라이언트 컴포넌트
// src > components > Button.tsx
"use client";

import React from "react";

const Button = () => {
  return (
    <button
      onClick={() => {
        alert("안녕하세요!");
      }}
    >
      클릭
    </button>
  );
};

export default Button;
2.3.2 예시2
아래 예시도 컴포넌트 분리를 해보자
분리 전
// src > app > page.tsx
"use client";

import { useEffect, useState } from "react";

// src>app>page.tsx
export default function Home() {
  const [count, setCount] = useState(0);

  useEffect(() => {
    console.log("렌더링이 완료되었습니다.");
  }, []);

  const handleClick = () => {
    setCount(count + 1);
  };

  return (
    <div className="p-8">
      안녕하세요! 내배캠 리액트.. 아니아니 넥스트입니다!
      <div>{count}</div>
      <button onClick={handleClick}>클릭</button>
    </div>
  );
}
분리 후
- 서버 컴포넌트
// src > app > page.tsx
import Counter from "@/components/Counter";

export default function Home() {
  return (
    <div className="p-8">
      안녕하세요! 내배캠 리액트.. 아니아니 넥스트입니다!
      <Counter />
    </div>
  );
}
- 클라이언트 컴포넌트
"use client";

import React from "react";

import { useState } from "react";

const Counter = () => {
  const [count, setCount] = useState(0);

  const handleClick = () => {
    setCount(count + 1);
  };

  return (
    <div>
      <div>{count}</div>
      <button onClick={handleClick}>클릭</button>
    </div>
  );
};

export default Counter;
3. 렌더링 이해하기
3.1 fetch와 Rendering Type
컴포넌트의 변화는 fetch한 데이터를 기준으로 변경이 되기 때문에 fetch 데이터의 변경은 컴포넌트 렌더링 방식을 규정한다고 볼 수 있다.
즉, fetch를 통해 여러가지 렌더링 패턴에 대해 이해할 수 있는 것이다.
| Rendering Type | 데이터 변화 유형 | 동작 방식 |
|---|---|---|
| SSG (Static Site Generation) | 영원히 변하지 않는 데이터 | SSG는 빌드타임(build-time)에만 컴포넌트를 생성하고 이후에는 페이지가 변하지 않는 것으로 가정하여 정적 컴포넌트를 제공한다. Next.js는 아무것도 하지 않으면 기본적으로 SSG로 동작한다. |
| ISR (Incremental Site Regeneration) | 가끔씩만 변하는 데이터, 일정 주기마다 가끔씩만 컴포넌트를 갱신 | ISR은 빌드타임(build-time)에 컴포넌트를 초기 생성하고, 이후에는 일정 주기마다 변화를 적용하여 컴포넌트를 갱신한다. |
| SSR (Server Side Rendering) | 실시간으로 계속 바뀌는 데이터, 컴포넌트 요청이 있을 때 마다 데이터를 갱신해서 최신 데이터만 제공 | SSR은 빌드타임(build-time)에 컴포넌트를 초기 생성하고, 사용자의 요청이 있을 때마다 서버에서 최신 데이터를 가져와 적용하여 동적으로 컴포넌트를 제공한다. |
| CSR (Client Side Rendering) | 실시간으로 계속 바뀌는 데이터, 컴포넌트 요청이 있을 때 마다 데이터를 갱신해서 최신 데이터만 제공 | CSR은 빌드타임에 컴포넌트를 초기 생성하지 않는다. 클라이언트 측에서 Javascript로 이루어진 리액트 파일을 다운로드 받고, 요청이 있을 때마다 데이터를 갱신하여 최신 데이터를 제공한다. |
3.2 렌더링 패턴 4가지 구현하기(with fetch)⭐
3.2.1 실습 전 세팅
먼저 실습을 위한 세팅을 하자
-
src > app > rendering > page.tsx 파일 만들기( page 컴포넌트 변경하면서 테스트를 진행하면 된다.)
import React from "react"; import SSG from "@/components/rendering/SSG"; const RenderingPage = () => { return ( <div> <h1>4가지 렌더링 방식 테스트하자!!</h1> <SSG /> </div> ); }; export default RenderingPage; -
각 렌더링 파일 만들기
- src >components > rendering > SSG.tsx
- src > components > rendering > ISR.tsx
- src > components > rendering > SSR.tsx
- src > components > rendering > CSR.tsx
-
src > types > index.ts 폴더를 만들고 아래 코드 붙여넣기
export type RandomUser = {
  gender: string;
  name: {
    title: string;
    first: string;
    last: string;
  };
  location: {
    street: {
      number: number;
      name: string;
    };
    city: string;
    state: string;
    country: string;
    postcode: string;
    coordinates: {
      latitude: string;
      longitude: string;
    };
    timezone: {
      offset: string;
      description: string;
    };
  };
  email: string;
  login: {
    uuid: string;
    username: string;
    password: string;
    salt: string;
    md5: string;
    sha1: string;
    sha256: string;
  };
  dob: {
    date: string;
    age: number;
  };
  registered: {
    date: string;
    age: number;
  };
  phone: string;
  cell: string;
  id: {
    name: string;
    value: string;
  };
  picture: {
    large: string;
    medium: string;
    thumbnail: string;
  };
  nat: string;
};
app 폴더의 하위 컴포넌트들만 라우팅에 관여! 따라서 components 폴더는 라우팅에 관여하지 않는다.
원활한 테스팅을 위해서 dev모드가 아닌 production mode로 진행해야 한다. (dev모드에선 SSR처럼 동작)
yarn build
yarn start
3.2.2 SSG
fetch시, 아무리 새로고침을 하여도 동일한 페이지만 출력되면 SSG(브라우저 갱신x)
SSG는 리액트 컴포넌트인데 async로 동작한다!(신기) next에선 서버 컴포넌트이므로 가능하다!
import Image from "next/image";
import React from "react";

import type { RandomUser } from "@/types";

const SSG = async () => {
  const response = await fetch(`https://randomuser.me/api`);
  const { results } = await response.json();
  const user: RandomUser = results[0];

  return (
    <div className="mt-8">
      <div className="border p-4 my-4">
        <div className="flex gap-8">
          {/* 유저 기본정보 */}
          <div>
            <Image
              src={user.picture.large}
              alt={user.name.first}
              width={200}
              height={200}
            />
            <h2 className="text-xl font-bold">
              {user.name.title}. {user.name.first} {user.name.last}
            </h2>
            <p className="text-gray-600">{user.email}</p>

            <div className="mt-4">
              <p>
                <span className="font-bold">전화번호 : </span>
                {user.phone}
              </p>
              <p>
                <span className="font-bold">휴대전화번호 : </span>
                {user.cell}
              </p>
              <p>
                <span className="font-bold">사는 곳 : </span>
                {user.location.city}, {user.location.country}
              </p>
              <p>
                <span className="font-bold">등록일자 : </span>
                {new Date(user.registered.date).toLocaleDateString()}
              </p>

              <p>
                <span className="font-bold">생년월일 : </span>
                {new Date(user.dob.date).toLocaleDateString()}
              </p>
            </div>
          </div>

          {/* 지도영역 */}
          <iframe
            src={`https://maps.google.com/maps?q=${user.location.coordinates.longitude},${user.location.coordinates.latitude}&z=15&output=embed`}
            height="450"
            width="600"
          ></iframe>
        </div>
      </div>
    </div>
  );
};

export default SSG;
- 아무 옵션을 주지 않은 것은 fetch에 force-cache라는 옵션을 부여한것과 똑같다.(디폴트 값 )
- force-cache 옵션은 브라우저가 요청 시 캐시를 사용하도록 강제한다.(최신 데이터 못가져옴)
const response = await fetch(`https://randomuser.me/api`, {
  cache: "force-cache",
});
3.2.3 ISR
fetch시, 주어진 시간에 한 번씩 갱신해주면 ISR
(1) 첫 번째 방법 : fetch에 옵션 주기
import Image from "next/image";
import React from "react";

import type { RandomUser } from "@/types";

const ISR = async () => {
  const response = await fetch(`https://randomuser.me/api`, {
    next: {
      revalidate: 5, // 5초마다 새로운 데이터 가져옴
    },
  });
  const { results } = await response.json();
  const user: RandomUser = results[0];

  return (
    <div className="mt-8">
      <div className="border p-4 my-4">
        <div className="flex gap-8">
          {/* 유저 기본정보 */}
          <div>
            <Image
              src={user.picture.large}
              alt={user.name.first}
              width={200}
              height={200}
            />
            <h2 className="text-xl font-bold">
              {user.name.title}. {user.name.first} {user.name.last}
            </h2>
            <p className="text-gray-600">{user.email}</p>

            <div className="mt-4">
              <p>
                <span className="font-bold">전화번호 : </span>
                {user.phone}
              </p>
              <p>
                <span className="font-bold">휴대전화번호 : </span>
                {user.cell}
              </p>
              <p>
                <span className="font-bold">사는 곳 : </span>
                {user.location.city}, {user.location.country}
              </p>
              <p>
                <span className="font-bold">등록일자 : </span>
                {new Date(user.registered.date).toLocaleDateString()}
              </p>

              <p>
                <span className="font-bold">생년월일 : </span>
                {new Date(user.dob.date).toLocaleDateString()}
              </p>
            </div>
          </div>

          {/* 지도영역 */}
          <iframe
            src={`https://maps.google.com/maps?q=${user.location.coordinates.longitude},${user.location.coordinates.latitude}&z=15&output=embed`}
            height="450"
            width="600"
          ></iframe>
        </div>
      </div>
    </div>
  );
};

export default ISR;
(2) 두 번째 방법 : page.tsx 컴포넌트에 revalidate 추가하기
ISR.tsx에 있는 next 옵션은 지워주자
import Image from "next/image";
import React from "react";

import type { RandomUser } from "@/types";

const ISR = async () => {
  const response = await fetch(`https://randomuser.me/api`); // 옵션x
  const { results } = await response.json();
  const user: RandomUser = results[0];

  return (
    <div className="mt-8">
      <div className="border p-4 my-4">
        <div className="flex gap-8">
          {/* 유저 기본정보 */}
          <div>
            <Image
              src={user.picture.large}
              alt={user.name.first}
              width={200}
              height={200}
            />
            <h2 className="text-xl font-bold">
              {user.name.title}. {user.name.first} {user.name.last}
            </h2>
            <p className="text-gray-600">{user.email}</p>

            <div className="mt-4">
              <p>
                <span className="font-bold">전화번호 : </span>
                {user.phone}
              </p>
              <p>
                <span className="font-bold">휴대전화번호 : </span>
                {user.cell}
              </p>
              <p>
                <span className="font-bold">사는 곳 : </span>
                {user.location.city}, {user.location.country}
              </p>
              <p>
                <span className="font-bold">등록일자 : </span>
                {new Date(user.registered.date).toLocaleDateString()}
              </p>

              <p>
                <span className="font-bold">생년월일 : </span>
                {new Date(user.dob.date).toLocaleDateString()}
              </p>
            </div>
          </div>

          {/* 지도영역 */}
          <iframe
            src={`https://maps.google.com/maps?q=${user.location.coordinates.longitude},${user.location.coordinates.latitude}&z=15&output=embed`}
            height="450"
            width="600"
          ></iframe>
        </div>
      </div>
    </div>
  );
};

export default ISR;
그리고 ISR을 import 하는 page에다 revalidate을 부여하자!
// src > app > rendering > page.tsx

import ISR from "@/components/rendering/ISR";
import React from "react";

export const revalidate = 5;

const RenderingTestPage = () => {
  return (
    <div>
      <h1>4가지 렌더링 방식을 테스트합니다.</h1>
      <ISR />
    </div>
  );
};

export default RenderingTestPage;
- 방법1과 방법2는 똑같이 동작하지만, 방법2는 컴포넌트 레벨에선 적용이 불가능하고 next에서 정의한 page.tsx 또는 layout.tsx에서만 동작한다.
- 즉, 페이지에 포함되어있는 모든 데이터가 10초마다 데이터를 갱신하게 되기 때문에 페이지 레벨로 revalidate를 적용할 떄 유용한 기능이다.
3.2.4 SSR
fetch시, 요청이 있을 때 마다 지속해서 갱신해주면 SSR(캐시된 데이터 취급x) -> 서버 사이드 렌더링
hydration이 완료되기 전까지의 시간. 즉, TTI(Time To Interactive)가 관건이다.
fetch에 옵션 주기
// src > components > rendering > SSR.tsx
import Image from "next/image";
import React from "react";

import type { RandomUser } from "@/types";

const SSR = async () => {
  const response = await fetch(`https://randomuser.me/api`, {
    cache: "no-cache", // 옵션 부여(캐시를 하지 않음!)
  });
  const { results } = await response.json();
  const user: RandomUser = results[0];

  return (
    <div className="mt-8">
      <div className="border p-4 my-4">
        <div className="flex gap-8">
          {/* 유저 기본정보 */}
          <div>
            <Image
              src={user.picture.large}
              alt={user.name.first}
              width={200}
              height={200}
            />
            <h2 className="text-xl font-bold">
              {user.name.title}. {user.name.first} {user.name.last}
            </h2>
            <p className="text-gray-600">{user.email}</p>

            <div className="mt-4">
              <p>
                <span className="font-bold">전화번호 : </span>
                {user.phone}
              </p>
              <p>
                <span className="font-bold">휴대전화번호 : </span>
                {user.cell}
              </p>
              <p>
                <span className="font-bold">사는 곳 : </span>
                {user.location.city}, {user.location.country}
              </p>
              <p>
                <span className="font-bold">등록일자 : </span>
                {new Date(user.registered.date).toLocaleDateString()}
              </p>

              <p>
                <span className="font-bold">생년월일 : </span>
                {new Date(user.dob.date).toLocaleDateString()}
              </p>
            </div>
          </div>

          {/* 지도영역 */}
          <iframe
            src={`https://maps.google.com/maps?q=${user.location.coordinates.longitude},${user.location.coordinates.latitude}&z=15&output=embed`}
            height="450"
            width="600"
          ></iframe>
        </div>
      </div>
    </div>
  );
};

export default SSR;
3.2.5 CSR
fetch시, 요청이 있을 때 마다 지속해서 갱신해주면 CSR
“use client” 들어가면 CSR이다.
client side rendering이기 때문에, loading에 관련된 state 제어를 통해 사용자에게 알려줄 수 있다!(가져와야하는 데이터가 많을 때 유용할 듯)
“use client” 옵션 주기
"use client"; // 옵션 부여

import Image from "next/image";
import React, { useEffect, useState } from "react";

import type { RandomUser } from "@/types";

const CSR = () => {
  const [user, setUser] = useState<RandomUser | null>(null);

  useEffect(() => {
    const fetchUser = async () => {
      const response = await fetch(`https://randomuser.me/api`);
      const { results } = await response.json();
      setUser(results[0]);
    };

    fetchUser();
  }, []);

  if (!user) {
    return <div>로딩중...</div>;
  }

  return (
    <div className="mt-8">
      <div className="border p-4 my-4">
        <div className="flex gap-8">
          {/* 유저 기본정보 */}
          <div>
            <Image
              src={user.picture.large}
              alt={user.name.first}
              width={200}
              height={200}
            />
            <h2 className="text-xl font-bold">
              {user.name.title}. {user.name.first} {user.name.last}
            </h2>
            <p className="text-gray-600">{user.email}</p>

            <div className="mt-4">
              <p>
                <span className="font-bold">전화번호 : </span>
                {user.phone}
              </p>
              <p>
                <span className="font-bold">휴대전화번호 : </span>
                {user.cell}
              </p>
              <p>
                <span className="font-bold">사는 곳 : </span>
                {user.location.city}, {user.location.country}
              </p>
              <p>
                <span className="font-bold">등록일자 : </span>
                {new Date(user.registered.date).toLocaleDateString()}
              </p>

              <p>
                <span className="font-bold">생년월일 : </span>
                {new Date(user.dob.date).toLocaleDateString()}
              </p>
            </div>
          </div>

          {/* 지도영역 */}
          <iframe
            src={`https://maps.google.com/maps?q=${user.location.coordinates.longitude},${user.location.coordinates.latitude}&z=15&output=embed`}
            height="450"
            width="600"
          ></iframe>
        </div>
      </div>
    </div>
  );
};

export default CSR;
댓글남기기