
[React] React 파일 및 프로젝트 셋업
[여기↗]에서 클론하면 프로젝트 설정이 완료된 레포지토리를 받을 수 있습니다!✨
협업 시에는 [프로젝트 협업 준비 및 진행 가이드↗]를 참고하자!
1. CRA 프로젝트 셋업
npx create-react-app {프로젝트명}
2. title 변경 (index.html)
public/index.html의 title 변경하기
3. .prettierrc 파일 만들기
- 팀원들과 코드포맷팅 규칙을 동일하게 설정하기 위해 root directory에
.prettierrc파일 생성하기 - prettier 익스텐션 설치 및 format on save 설정을 해줘야한다. [설정 방법 - 목차 1.2 참고↗]
{
  "printWidth": 120,
  "tabWidth": 2,
  "useTabs": false,
  "semi": true,
  "singleQuote": true,
  "bracketSpacing": true,
  "trailingComma": "none"
}
4. jsconfig.json 생성해 절대 경로 지정하기
root directory에 생성해야한다.
{
	"compilerOptions": {
		"baseUrl": "src"
	},
	"include": ["src"]
}
5. styled-components 설치
styled-components 사용시 css 파일은 전부 삭제해도 좋다.
yarn add styled-components
6. 폴더 구조 생성
프로젝트에 따라 유동적으로 생성하면 된다.
⚠️ src/pages 하위 컴포넌트들은 컴포넌트+Page 로 작명하기! (EX: HomePage.jsx)
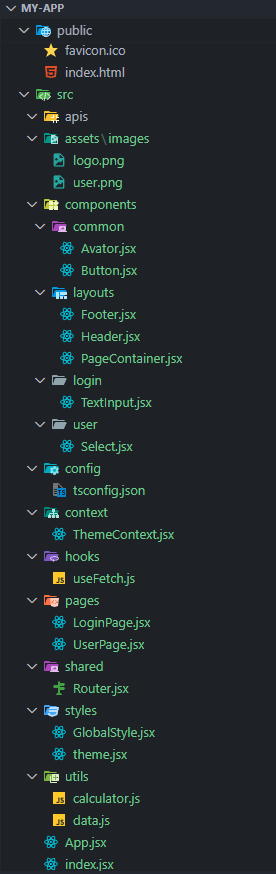
📦my-app
├──📂public                      // 정적 파일들이 위치하는 폴더
│   ├──📜favicon.ico
│   └──📜index.html
└──📂src                         // 소스 코드가 위치하는 폴더
    ├──📜App.jsx
    ├──📜index.jsx
    ├──📂apis                    // API 호출 관련 모듈들이 위치하는 폴더
    ├──📂assets                  // 정적 자원들을 포함하는 폴더
    │   └──📂images
    │       ├──📜logo.png
    │       └──📜user.png
    ├──📂components              // 리액트 컴포넌트들이 위치하는 폴더
    │   ├──📂common              // 공통 컴포넌트들이 위치하는 폴더
    │   │   ├──📜Avatar.jsx
    │   │   ├──📜Button.jsx
    │   │   ├──📂loadings        // 로딩 관련 컴포넌트들이 위치하는 폴더
    │   │   ├──📂modals          // 모달 관련 컴포넌트들이 위치하는 폴더
    │   ├──📂layouts             // 페이지 레이아웃 관련 컴포넌트들이 위치하는 폴더
    │   │   ├──📜Footer.jsx
    │   │   ├──📜Header.jsx
    │   │   ├──📜PageContainer.jsx
    │   ├──📂login               // 로그인 관련 컴포넌트들이 위치하는 폴더
    │   │   ├──📜TextInput.jsx
    │   ├──📂user                // 사용자 관련 컴포넌트들이 위치하는 폴더
    │       ├──📜Select.jsx
    ├──📂config                  // 프로젝트 설정 파일들이 위치하는 폴더
    │   ├──📜tsconfig.json
    ├──📂context                 // 상태 관리를 위한 Context API 관련 파일들이 위치하는 폴더
    │   ├──📜ThemeContext.jsx
    ├──📂hooks                   // 재사용 가능한 커스텀 훅들이 위치하는 폴더
    │   ├──📜useFetch.js
    ├──📂pages                   // 페이지 컴포넌트들이 위치하는 폴더
    │   ├──📜LoginPage.jsx
    │   ├──📜UserPage.jsx
    ├──📂shared                  // 라우터가 위치하는 폴더
    │   ├──📜Router.jsx
    ├──📂styles                  // 애플리케이션의 전역 스타일 및 테마 관련 파일들이 위치하는 폴더
    │   ├──📜GlobalStyle.jsx
    │   ├──📜theme.jsx
    ├──📂utils                   // 유틸리티 함수들이 위치하는 폴더
        ├──📜calculator.js
        ├──📜data.js
- 시맨틱 태그(
main, header, nav, section, ul, li) 사용 - custom hook 생성시 파일 명
use로 시작
7. react-router-dom 설치
설치하기
yarn add react-router-dom
생성 및 router 설정 코드 작성
// Router.jsx
import { BrowserRouter, Route, Routes, Navigate } from "react-router-dom";
import HomePage from "pages/HomePage";
import UserPage from "pages/UserPage";

const Router = () => {
  return (
    <BrowserRouter>
      <Routes>
        <Route path="/" element={<HomePage />} />
        <Route path="user" element={<UserPage />} />

        {/* 사용자가 잘못된 경로로 이동했을 때 기본적으로 (/)로 리다이렉션 */}
        <Route path="*" element={<Navigate replace to="/" />} />
      </Routes>
    </BrowserRouter>
  );
};

export default Router;
App.jsx에 import 및 적용
// App.jsx
import Router from "shared/Router";

const App = () => {
  return <Router />;
};

export default App;
8. reset.css 및 전역 스타일링 적용
8.1 패키지 사용 o
설치하기
// yarn
$ yarn add styled-reset

// npm
$ npm i styled-reset
코드 적용
GlobalStyle.jsx 파일에 아래와 같이 적어주기
// src/styles/GlobalStyle.jsx
import reset from "styled-reset";
import { createGlobalStyle } from "styled-components";

const GlobalStyle = createGlobalStyle`
 ${reset}
  body {
    font-family: "Helvetica", "Arial", sans-serif;
    background-color:#F5F5F5;
    height:100vh;
  }
  a{text-decoration:none;}
  a:visited { color:black; }
`;

export default GlobalStyle;
8.2 패키지 사용 x
styled-reset을 설치하지 않고 reset.css를 적용하려면 아래와 같이 해주면 된다.
reset.css↗ 접속해서 복사한 후 적용하기
// src/styles/GlobalStyle.jsx
import { createGlobalStyle } from "styled-components";

const GlobalStyle = createGlobalStyle`
    html, body, div, span, applet, object, iframe,
    h1, h2, h3, h4, h5, h6, p, blockquote, pre,
    a, abbr, acronym, address, big, cite, code,
    del, dfn, em, img, ins, kbd, q, s, samp,
    small, strike, strong, sub, sup, tt, var,
    b, u, i, center,
    dl, dt, dd, ol, ul, li,
    fieldset, form, label, legend,
    table, caption, tbody, tfoot, thead, tr, th, td,
    article, aside, canvas, details, embed,
    figure, figcaption, footer, header, hgroup,
    menu, nav, output, ruby, section, summary,
    time, mark, audio, video {
        margin: 0;
        padding: 0;
        border: 0;
        font-size: 100%;
        font: inherit;
        vertical-align: baseline;
    }
    /* HTML5 display-role reset for older browsers */
    article, aside, details, figcaption, figure,
    footer, header, hgroup, menu, nav, section {
        display: block;
    }
    body {
        line-height: 1;
    }
    ol, ul {
        list-style: none;
    }
    blockquote, q {
        quotes: none;
    }
    blockquote:before, blockquote:after,
    q:before, q:after {
        content: '';
        content: none;
    }
    table {
        border-collapse: collapse;
        border-spacing: 0;
    }

    // 속성 추가
    *{
        box-sizing:border-box;
        text-decoration-line:none;
        color: inherit;
    }

    // index.css에 있던 속성
    body {
      margin: 0;
      font-family: -apple-system, BlinkMacSystemFont, 'Segoe UI', 'Roboto', 'Oxygen',
        'Ubuntu', 'Cantarell', 'Fira Sans', 'Droid Sans', 'Helvetica Neue',
        sans-serif;
      -webkit-font-smoothing: antialiased;
      -moz-osx-font-smoothing: grayscale;
    }

    code {
      font-family: source-code-pro, Menlo, Monaco, Consolas, 'Courier New',
        monospace;
  }
`;

export default GlobalStyle;
// index.jsx
import React from "react";
import ReactDOM from "react-dom/client";
import App from "./App";
import GlobalStyle from "styles/GlobalStyle"; // import

const root = ReactDOM.createRoot(document.getElementById("root"));
root.render(
  <React.StrictMode>
    <App />
    <GlobalStyle />
  </React.StrictMode>
);
9. theme.jsx
theme.jsx 파일에서 색상 관련 상수들을 정의하고, 이를 다른 파일에서 가져와서 사용하기
const colors = {
  mainColor: "#171E2E",
  subColor: "#4F4F4F",
  mainTextColor: "#8B8B8B",
  starColor: "#FDD037",
  buttonHoverColor: "#f54f26",
};

export default colors;
// Button.jsx
import styled from "styled-components";
import colors from "./theme"; // import

const Button = () => {
  return <StyledButton>버튼 클릭</StyledButton>;
};

export default Button;

const StyledButton = styled.button`
  background-color: ${colors.buttonHoverColor};
`;
10. 환경변수(.env) 셋업
Firebase 사용 시,
- Firebase의 계정 config 정보(api_key포함) 등 보안이 필요한 정보들은 .env.local 파일에 담아서 github에 공유되지 않도록 한다.
- root directory 에 .env.local 이란 이름의 파일을 만든다. ⭐️ .env.local은 CRA로 리액트 프로젝트 생성 시 .gitignore에 기본으로 기입되어 github에 공유되지 않는다.
- .env.local 예시 (Firebase에서 본인의 프로젝트 설정을 참고해서 만들어야한다.)
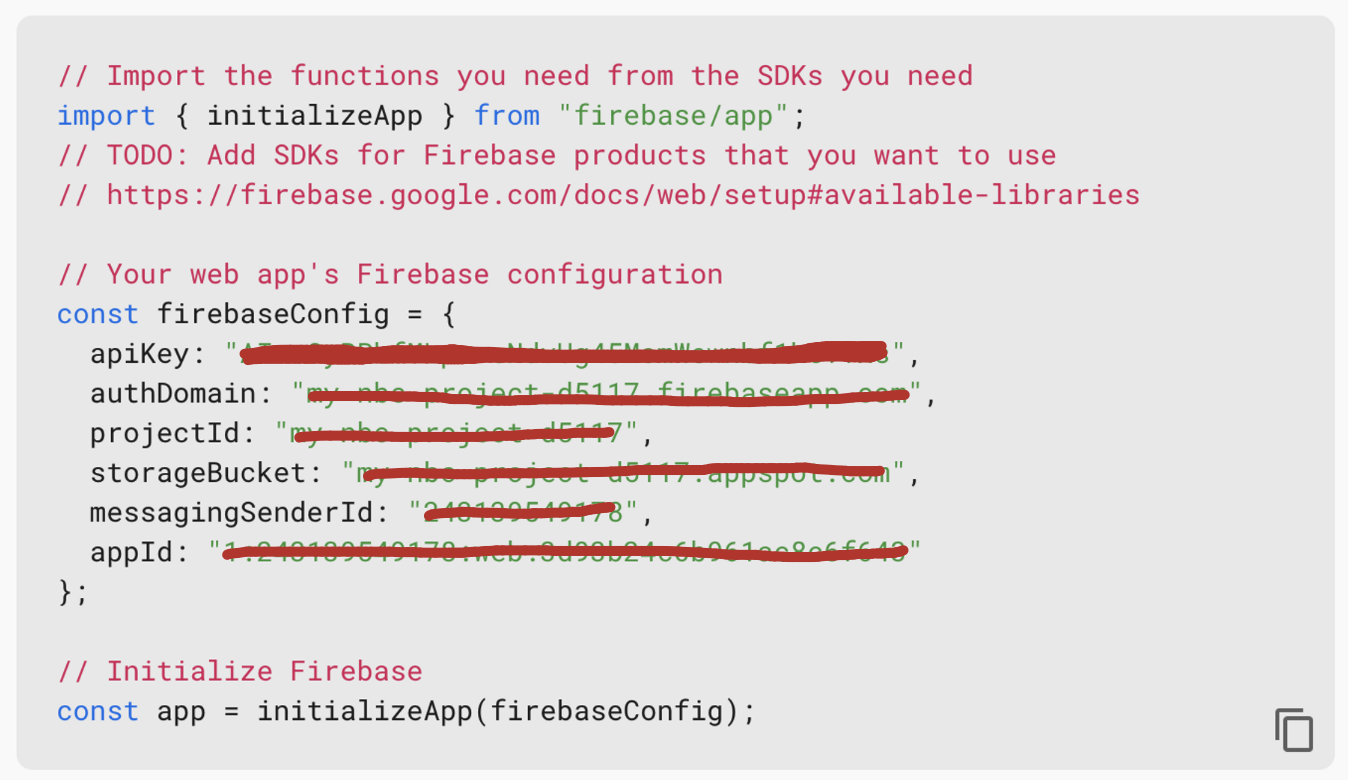
⬇️ 아래 코드를 참조해서 .env.local 내용 구성
.env.local 파일 내용 (CRA로 만든 리액트 프로젝트의 .env 내용은 반드시 “REACT_APP”이란 접두사가 있어야 호환된다.)
REACT_APP_FB_API_KEY="MY_API_KEY";
REACT_APP_FB_AUTH_DOMAIN="MY_AUTH_DOMAIN";
REACT_APP_PROJECT_ID="MY_PROJECT_ID";
REACT_APP_STORAGE_BUCKET="MY_STORAGE_BUCKET";
REACT_APP_MESSAGING_SENDER_ID="MY_MESSAGING_SENDER_ID";
REACT_APP_APP_ID="MY_APP_ID";
// firebase.js

// Import the functions you need from the SDKs you need
import { initializeApp } from "firebase/app";
// TODO: Add SDKs for Firebase products that you want to use
// https://firebase.google.com/docs/web/setup#available-libraries

// Your web app's Firebase configuration
const firebaseConfig = {
  apiKey: process.env.REACT_APP_FB_API_KEY,
  authDomain: process.env.REACT_APP_FB_AUTH_DOMAIN,
  projectId: process.env.REACT_APP_PROJECT_ID,
  storageBucket: process.env.REACT_APP_STORAGE_BUCKET,
  messagingSenderId: process.env.REACT_APP_MESSAGING_SENDER_ID,
  appId: process.env.REACT_APP_APP_ID,
};

// Initialize Firebase
const app = initializeApp(firebaseConfig);
// TODO: Add SDKs for Firebase products that you want to use
// https://firebase.google.com/docs/web/setup#available-libraries
댓글남기기