[Spring] 김영한 스프링 입문 정리 #1 프로젝트 환경설정
1. 프로젝트 생성
1.1 스프링 부트 스타터
스프링 프로젝트를 만들기 위해 스프링 부트 스타터 사이트로 이동하자 https://start.spring.io/
아래와 같이 설정해준 후 ADD DEPENDENCIES 클릭하고 Thymeleaf, Spring Web 선택하기!
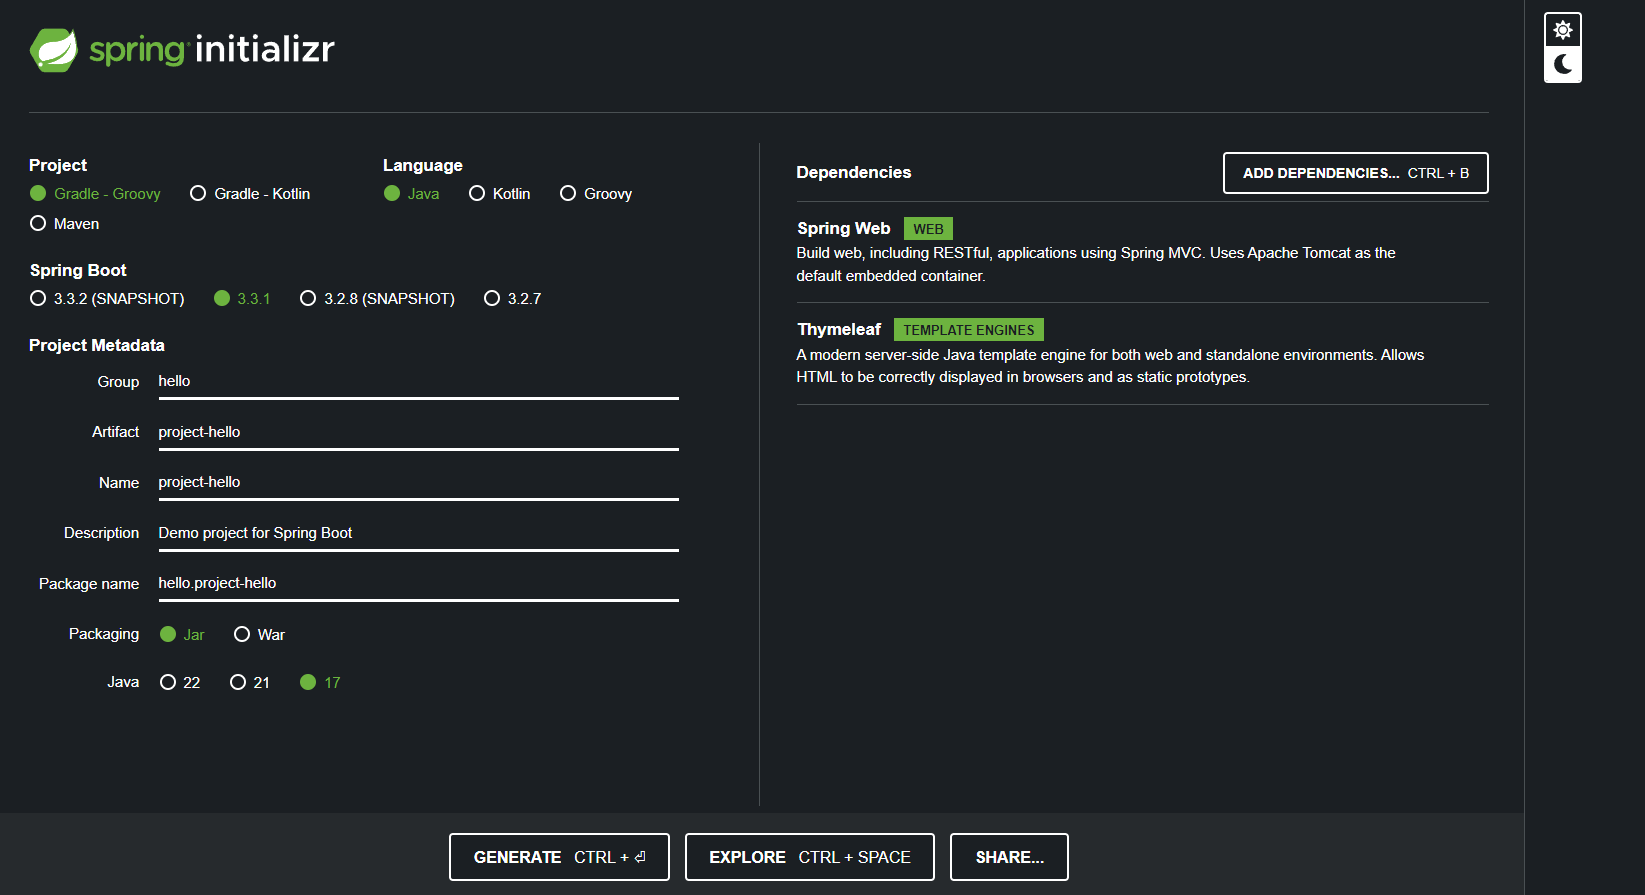
다음으로, GENERATE 클릭해서 다운로드 받자

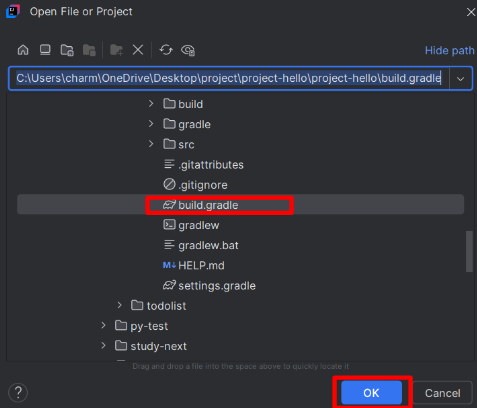
그 후, 생성한 프로젝트에 있는 build.gradle를 열어주면 된다.
build.gradle은 Gradle 빌드 도구에서 사용하는 설정 파일로, 주로 프로젝트의 의존성 관리와 빌드 설정을 정의하는 데 사용된다.
1.2 IntelliJ JDK 설치 확인
프로젝트를 오픈하니, “잘못된 Gradle JVM 구성을 발견했습니다. JDK 22.0.1이(가) Gradle 8.8와(과) 호환되지 않습니다. JAVA_HOME 환경 변수를 수정하세요.” 라는 오류가 발생했다.

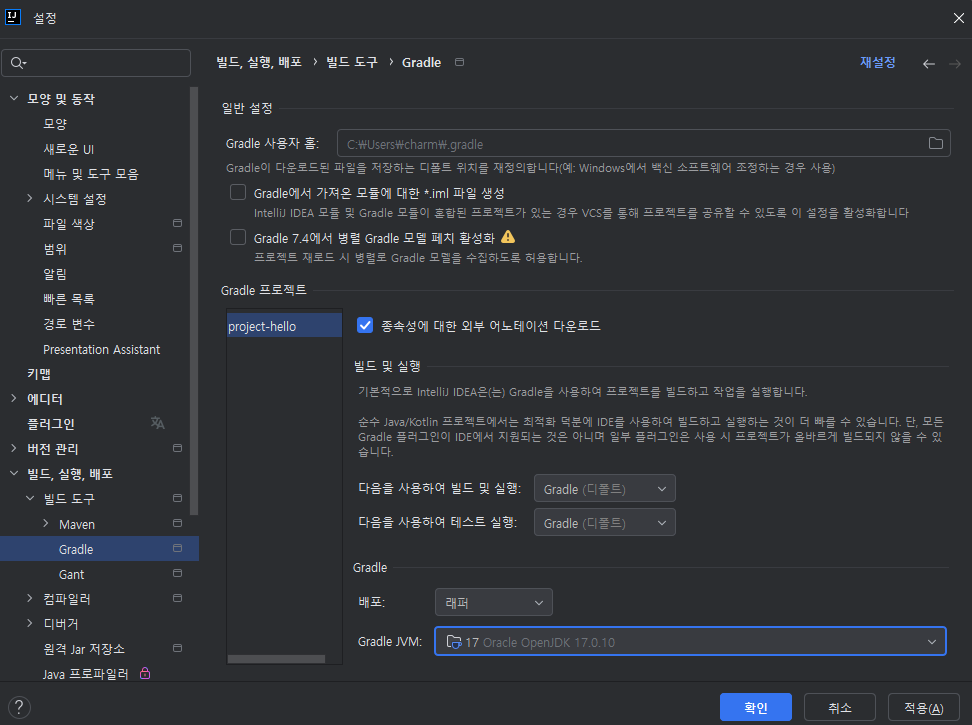
ⓛ 프로젝트 JDK 설정 확인
IntelliJ 설정창 (Window: Ctrl + Alt + S / MAC: Ctrl + ,) > 빌드, 실행, 배포 > Gradle > Gradle JVM Java version 을 17 버전 이상으로 지정
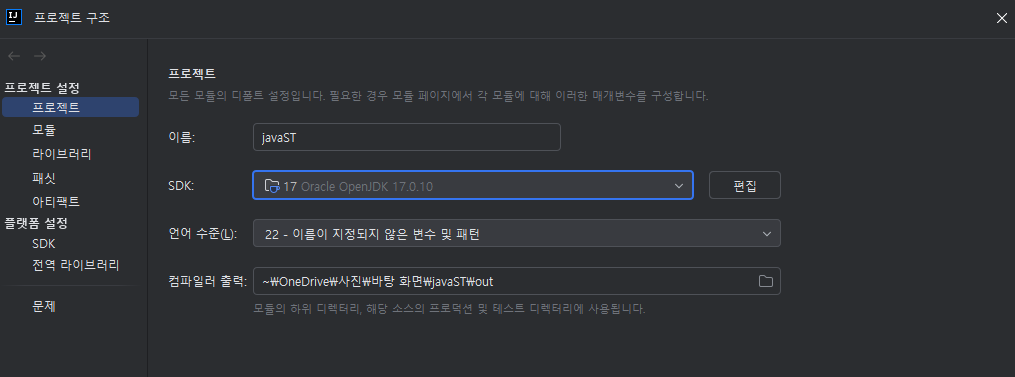
② Gradle JDK 설정 확인
프로젝트 구조창 (Window: Ctrl + Alt + Shift + S / MAC: Ctrl + ;) > 프로젝트 > JDK 17 버전 이상으로 지정
1.3 프로젝트 실행하기
아래 main > java에 있는 프로젝트 실행하기

http://localhost:8080에 접속하고 아래와 같이 뜨면 성공!
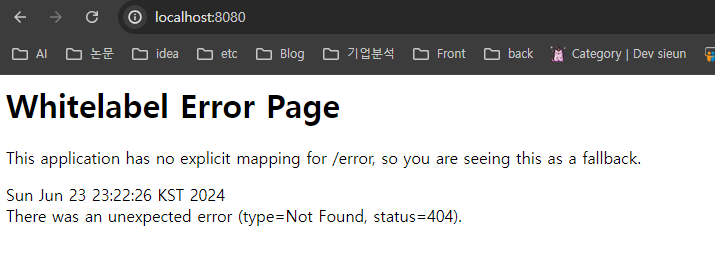
1.4 IntelliJ Gradle 대신에 자바 직접 실행
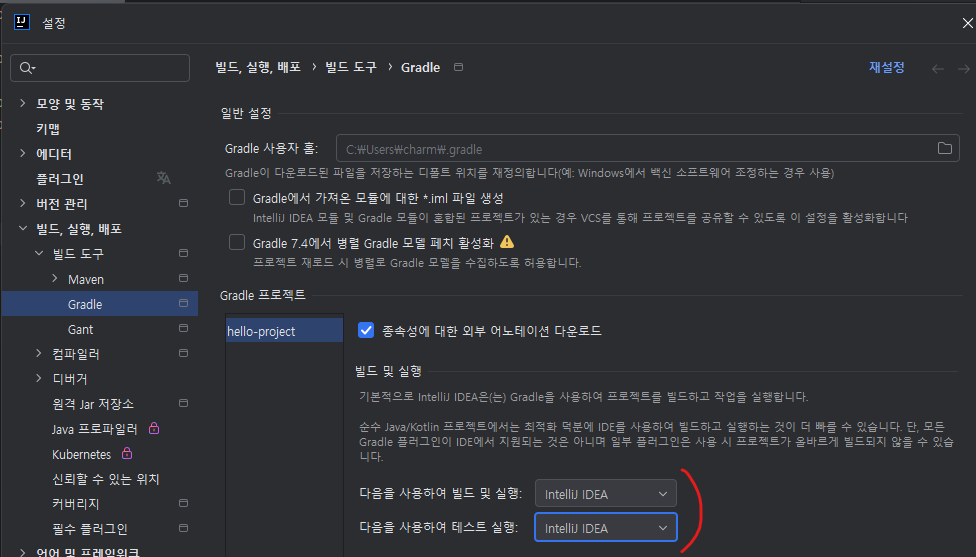
최근 IntelliJ 버전은 Gradle을 통해서 실행 하는 것이 기본 설정이다. 이렇게 하면 실행속도가 느리다.
빠른 실행을 위해서 IntelliJ 설정창 (Window: Ctrl + Alt + S / MAC: Ctrl + ,) > 빌드, 실행, 배포 > Gradle > Intellij IDEA로 수정하자.
2. 라이브러리
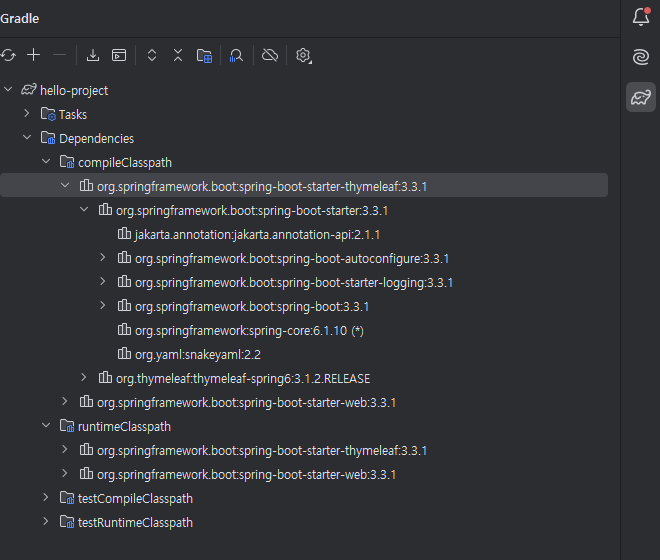
Gradle은 의존관계가 있는 라이브러리를 함께 다운로드한다.
2.1 스프링 부트 라이브러리
- spring-boot-starter-web
- spring-boot-starter-tomcat: 톰캣 (웹서버)
- spring-webmvc: 스프링 웹 MVC
- spring-boot-starter-thymeleaf: 타임리프 템플릿 엔진(View)
- spring-boot-starter(공통): 스프링 부트 + 스프링 코어 + 로깅
- spring-boot
- spring-core
- spring-boot-starter-logging
- logback, slf4j (요즘엔 로깅을 이 두가지 조합으로 많이 운영을 함)
- spring-boot
2.2 테스트 라이브러리
- spring-boot-starter-test
- junit: 테스트 프레임워크
- mockito: 목 라이브러리
- assertj: 테스트 코드를 좀 더 편하게 작성하게 도와주는 라이브러리
- spring-test: 스프링 통합 테스트 지원
3. View 환경설정
http://localhost:8080/ 로 접속했을 때 나오는 에러 페이지를 Welcom Page로 변경해 보자.
3.1 Welcome Page 만들기
스프링부트는
src > resources > static > index.html에 있는 페이지를 첫 화면으로 렌더링한다.
static > index.html 생성 후 아래 코드 복붙 (!를 입력하고 Tab을 누르면 HTML 기본 문서 구조가 자동으로 생성된다.)
<!DOCTYPE html>
<html>
  <head>
    <title>Hello</title>
    <meta http-equiv="Content-Type" content="text/html; charset=UTF-8" />
  </head>
  <body>
    Hello
    <a href="/hello">hello</a>
  </body>
</html>
서버를 껐다 키면 렌더링 완료!
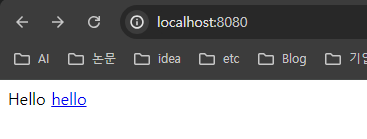
현재 Welcome Page는 정적 콘텐츠만 제공하지만, 템플릿 엔진을 활용하면 사용자 요청에 따라 동적으로 페이지를 생성하고 로드할 수 있다.
3.2 thymeleaf 템플릿 엔진
타임리프는 동적 웹 페이지를 생성하는 템플릿 엔진으로, 컨트롤러가 전달한 데이터를 사용해 화면을 구성한다.
- thymeleaf 공식 사이트: https://www.thymeleaf.org/
- 스프링 공식 튜토리얼: https://spring.io/guides/gs/serving-web-content/
- 스프링부트 메뉴얼: https://docs.spring.io/spring-boot/docs/2.3.1.RELEASE/reference/html/spring-boot-features.html#boot-features-spring-mvc-template-engines
java > 생성한 project 이름 우클릭 후 controller라는 패키지 생성 > 생성한 패키지에 Java 클래스 클릭하여 HelloController라는 컨트롤러 생성
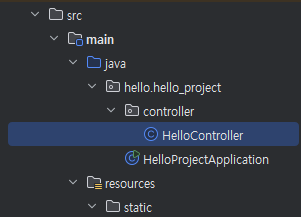
그 후, 생성한 HelloController에 아래와 같이 코드 작성
package hello.hello_project.controller;

import org.springframework.stereotype.Controller;
import org.springframework.ui.Model;
import org.springframework.web.bind.annotation.GetMapping;

@Controller
public class HelloController {

    @GetMapping("hello")
    public String hello(Model model){
        model.addAttribute("data","hello!!!");
        return "hello";
    }
}
그 후, templates > hello.html을 생성하고 아래 코드를 입력하기
resources/templates/hello.html
th는 타임리프의 th이다.
<!DOCTYPE html>
<html xmlns:th="http://www.thymeleaf.org">
  <head>
    <title>Hello</title>
    <meta http-equiv="Content-Type" content="text/html; charset=UTF-8" />
  </head>
  <body>
    <p th:text="'안녕하세요. ' + ${data}">안녕하세요. 손님</p>
  </body>
</html>
이렇게 되면 HelloController에서 model.addAttribute의 value가 위 코드의 ${data}로 치환이 되게 된다.

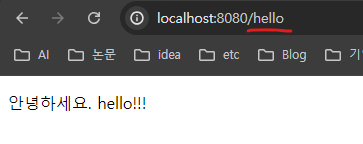
3.3 thymeleaf 템플릿 엔진 동작 원리
thymeleaf 템플릿엔진 동작 확인해보자 (실행: http://localhost:8080/hello)
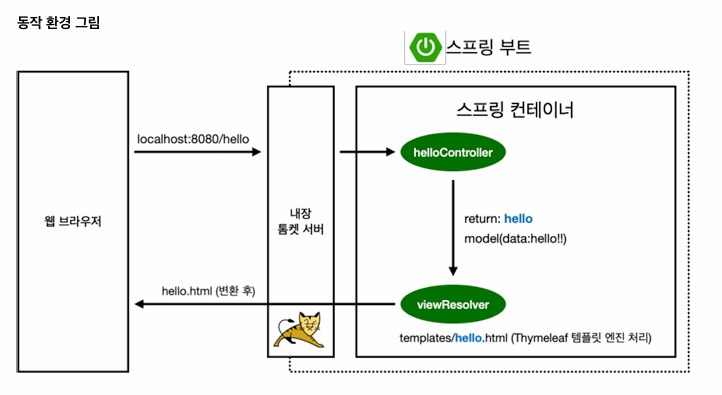
① 브라우저에서 요청
웹 브라우저가 http://localhost:8080/hello로 요청을 전송한다.
② 스프링 부트의 내장 톰캣(Web 서버)이 요청을 처리
내장된 톰캣 서버가 요청을 받아 Spring MVC로 전달한다.
③ HelloController의 hello 메서드 실행
@GetMapping("hello")에 매핑된 hello 메서드가 호출된다.
메서드는 Model 객체에 데이터를 추가한다.
@Controller
public class HelloController {

  // hello 메서드 호출
    @GetMapping("hello")
    public String hello(Model model){
        model.addAttribute("data","hello!!!");
        return "hello";
    }
}
이 코드는 data라는 키로 "hello!!!" 값을 모델에 저장한다.
④ 뷰 리졸버(ViewResolver)가 HTML 템플릿 찾기
hello 메서드는 return "hello";를 통해 뷰 이름을 반환한다.
스프링의 뷰 리졸버(ViewResolver)가 템플릿 파일 경로를 구성한다.
resources/template/ + {ViewName} + .html
resources/templates/hello.html
위 경로의 HTML 파일이 렌더링 대상이다.
⑤ Thymeleaf가 템플릿 처리
hello.html 파일을 로드하고, HTML 템플릿 내부의 Thymeleaf 문법(th:text)에 따라 서버에서 데이터를 동적으로 주입한다.
<p th:text="'안녕하세요. ' + ${data}">안녕하세요. 손님</p>
${data}는 컨트롤러에서 전달한 model.addAttribute의 값을 참조한다.
최종 결과는 다음과 같이 렌더링된다.
<p>안녕하세요. hello!!!</p>
⑥ 렌더링된 HTML 반환
Thymeleaf가 데이터가 포함된 최종 HTML을 생성하여 클라이언트(브라우저)에 전달한다.
참고
- pring-boot-devtools 라이브러리를 추가하면, html 파일을 컴파일만 해주면 서버 재시작없이 View 파일 변경이 가능하다.
- IntelliJ 컴파일 방법: 메뉴 build -> Recompile
4. 빌드하고 실행하기(windows)
프로젝트 실행을 종료하고 아래 단계를 진행해주자.
① 프로젝트 폴더로 이동해서 cmd 창 열기
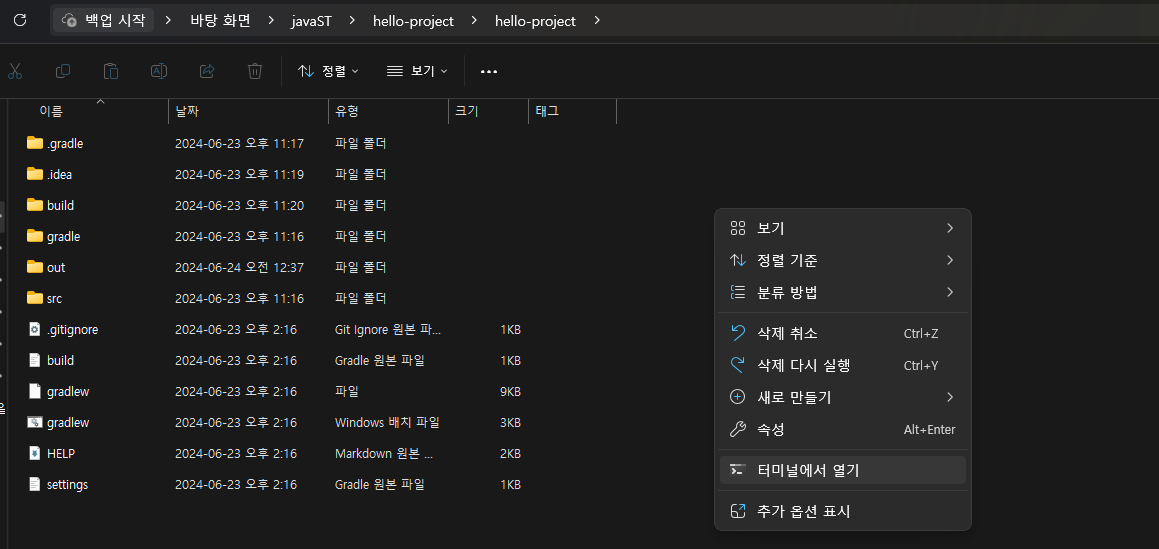
② ./gradlew build로 빌드하기
(오류가 나면 ./gradlew clean build 해주기)

③ cd build/libs로 이동하기
hello-project-0.0.1-SNAPSHOT.jar 파일을 확인할 수 있다.

④ jar 파일을 실행시키기
java -jar hello-project-0.0.1-SNAPSHOT.jar

⑤ 실행 완료!


댓글남기기